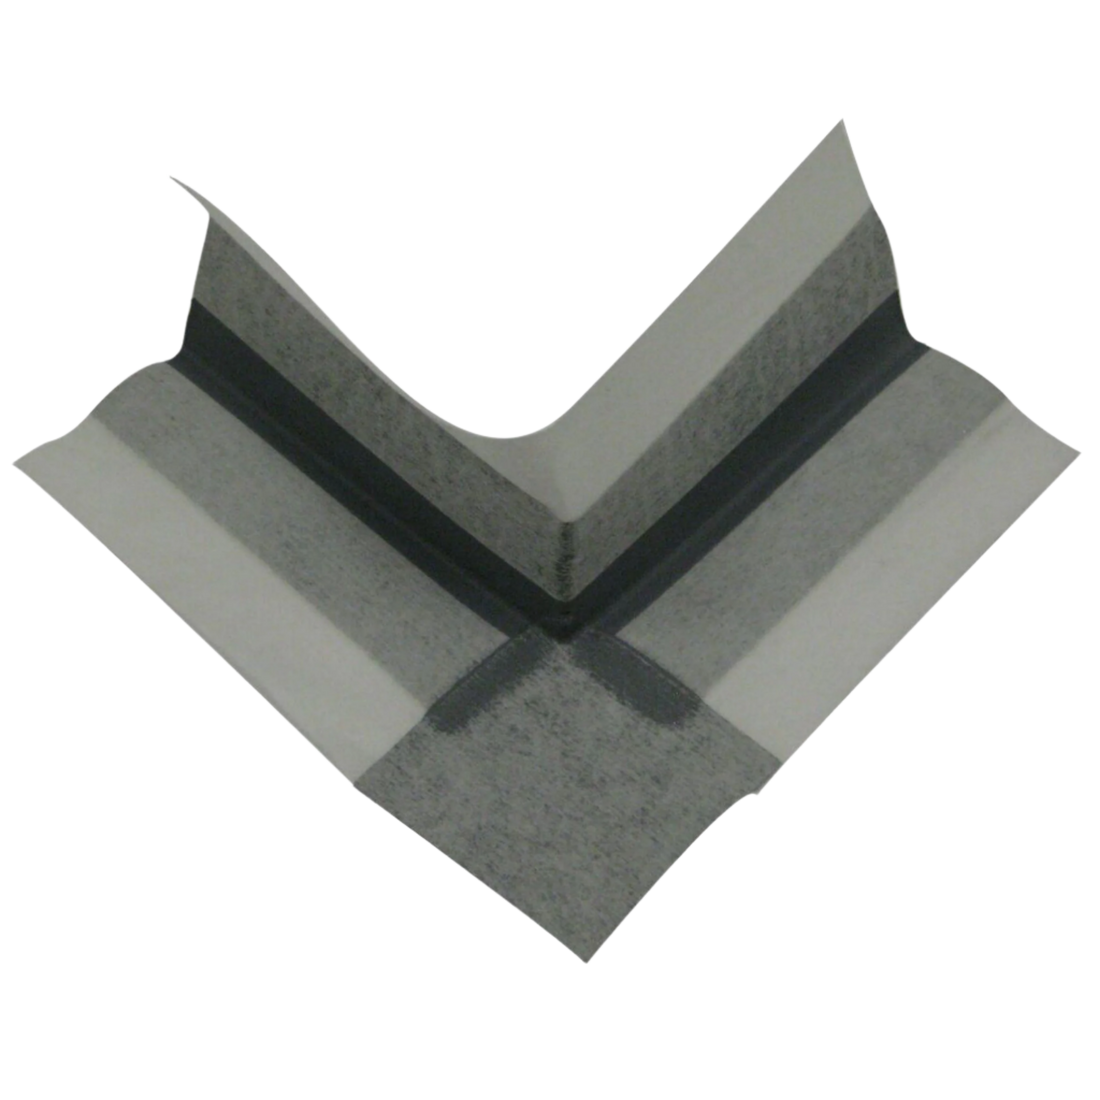
Potential Outcome: Poor adhesion leading to water ingress at junctions
Adheseal Best Practice: Always embed corners into a wet film of Gripset membrane, ensuring full saturation of the fabric edges.
Potential Outcome: Material degradation or loss of waterproofing performance
Adheseal Best Practice: Only use with compatible Gripset membranes and water-based systems.
Achieving a fully waterproof, movement-accommodating seal at internal corners without creating bulky overlaps or weak points.
Embed the Elastoproof corner into wet Gripset membrane, ensuring full saturation of fabric edges. Overlap Elastoproof Jointing Band by a minimum of 40mm to maintain a seamless barrier.
Use a flat spatula to smooth out creases and remove trapped air before applying subsequent membrane coats.
Preventing water ingress at exposed balcony corners where thermal and structural movement is high.
Install the external 270º corner unit into wet membrane, then integrate with surrounding waterproofing layers to form a continuous seal.
Install during mild weather (5°C to 30°C) to optimise adhesion and flexibility during curing.
These corner sections are engineered for compatibility with all Gripset membranes. Using them with other membranes may compromise adhesion or performance, and should only proceed after compatibility testing.
Always overlap Elastoproof Jointing Bands by a minimum of 40mm onto the prefabricated corner section to ensure a seamless, watertight seal.
Installation should occur when surface temperatures are between 5°C and 30°C. Below or above this range, adhesion and flexibility may be reduced.
When used with Gripset membranes, a separate primer is typically not required. However, ensure the surface is clean, sound, and prepped according to membrane requirements before application.
If the membrane skins before embedding, proper adhesion will not be achieved. Always bed corners into a fresh, wet film for full bond strength.
Application / Use Case | Key Benefit | Primary Trades |
---|---|---|
Internal 90º corner sealing in bathrooms and wet areas | Provides a seamless, elastic waterproof barrier without bulky overlaps | Waterproofers, Tilers |
External 270º balcony corner detailing | Accommodates movement while preventing water ingress at exposed corners | Waterproofers, Tilers, Builders |
Integration with Elastoproof Jointing Bands | Ensures continuous waterproofing with ≥ 40 mm overlap for long-term performance | Waterproofers, Remedial Contractors |
Membrane junction reinforcement in volatile areas | Eliminates lapping/bonding issues at corners for a cleaner, stronger seal | Waterproofers, Builders |
Wall-to-floor transition sealing | Improves tear resistance and durability at high-stress junctions | Waterproofers, Tilers |
Ensure substrate is clean, dry, and structurally sound. Remove dust, debris, oils, and loose materials. Check substrate suitability and adhesion of associated products before starting.
Use a stiff brush or vacuum to remove dust. Wipe with a damp cloth if required and allow to dry fully before membrane application.
Perform a small-area adhesion test with the chosen Gripset membrane to confirm compatibility and bond strength before large-scale application.
Apply a liberal, even coat of the selected Gripset membrane to the substrate at the corner location, covering 100% of the rear profile area.
Work membrane into the substrate with a brush to achieve full wetting. Apply thick enough to maintain a wet film until the corner is embedded.
Spread evenly with a roller or notched trowel to the recommended membrane thickness, ensuring no gaps or thin spots.
Position the Elastoproof corner into the wet membrane bed. Fully wet out fabric edges and press firmly to ensure adhesion without voids.
Smooth from the centre outwards to remove air pockets and creases. Work membrane through the fabric edges to ensure full contact.
Brush membrane over the corner face and onto the adjacent substrate to seal fibres and create a continuous barrier.
Overlap Elastoproof Jointing Bands by at least 40mm onto the corner piece using the same Gripset membrane for adhesion.
Apply membrane to the joint area, lay banding over the corner with the correct overlap, and press to integrate with the corner fabric.
Coat over the seam and corner face to create a continuous, watertight finish.
Handle in clean conditions. When installing with membranes/primers, wear PPE as directed by the membrane system’s SDS (e.g., gloves and eye protection). Avoid contact with solvent-based products.
Ensure adequate ventilation during membrane application as per the membrane manufacturer’s guidance. Do not use solvent-based products with this component.
The corner sections are installed with Gripset membranes; follow the membrane’s storage and ignition-source precautions. Do not introduce solvent-based adhesives, sealants or coatings during detailing.
For unusual substrates or conditions, contact Gripset Technical Services before commencing application.
Substrate must be sound, clean and dry. Apply a liberal, even coat of the selected Gripset membrane to fully cover 100% of the rear corner profile. Embed the prefabricated corner into the wet membrane film and fully wet out the fabric edges; smooth with a flat spatula/brush to remove creases and trapped air. Remove excess membrane from the face and surrounding surface.
When bedding into a wet Gripset membrane, an additional primer at the corner piece is typically not required; confirm per membrane TDS.
As specified by selected Gripset membrane systemEnsure sheets are fixed per manufacturer, clean of dust and residue. Apply sufficient wet Gripset membrane to cover the entire rear of the corner profile; embed immediately and wet out the fabric edges. Smooth out to eliminate creases/air pockets; brush off excess on the face.
Follow the membrane system primer guidance for porous sheet materials.
As specified by selected Gripset membrane systemConfirm boards are suitable for wet areas and fixed true. Clean and dry surfaces. Apply a wet film of Gripset membrane covering the rear of the corner; embed and fully wet the fabric edges. Smooth to remove creases/air; remove excess membrane from the face.
Use the membrane system’s specified primer where substrate sealing is needed.
As specified by selected Gripset membrane systemEnsure substrates are rigid, fastened, and dry. Apply adequate wet Gripset membrane to cover 100% of the rear corner profile. Embed immediately; wet out fabric edges and smooth to expel air/creases. Brush away excess from the face/surrounds.
Prime as per membrane TDS where timber sealing is required.
As specified by selected Gripset membrane systemClean and abrade (if compatible) to ensure bond. Apply a fresh wet film of the selected Gripset membrane; embed the corner, fully wet the fabric, and smooth out. Remove excess from the face. Overlap Elastoproof Jointing Band by a minimum of 40 mm onto the corner piece for a seamless barrier.
Perform a small-area compatibility/adhesion test on unusual substrates before proceeding.
As specified by selected Gripset membrane systemApplication temperature: Apply only when surface temperature is between 5 °C and 30 °C. Avoid solvent-based adhesives, sealants, or coatings in contact with this component.
Sizing: Internal 90° and external 270° corners supplied at 200 mm × 200 mm with 120 mm wall/floor returns.
Compatibility: Designed for use with Gripset waterproofing membranes. For non-Gripset systems, conduct adhesion/compatibility testing before use.